Leaky roofs are often a nightmare for anyone residing in the house. Especially because the he source of many roof leaks is very hard to trace. The water might be dripping from some place but the actual leak originates away where it is actually leaking. Take advice from a professional roofer or look through any worn out, missing or broken shingles if you want the trace the roof by yourself.
How to find the source of a roof leak?
As mentioned above, look for any missing shingles on the roof or any other places where nails are loose. Corroded roof flashing or one that is poorly sealed also may be the reason for leaking roof. This generally originates around the chimneys, skylights and sometimes along juncture at roof planes. Find the place where the water is dripping from and then work your way up to the source of leak. The best time to find the leak is during the day. Securely climb on the roof or get into the attic and carry a bright flashlight with you to spot the roof as those inside the house will be able to clearly see the leak.
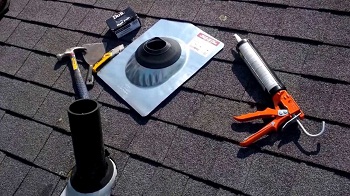 Image Source: i.ytimg.com
How much damage does a leaking roof cause?
Water that passes through the roof as a result of leaks and flows through the roof rafters, sheathing and the top of the ceilings damaging all these as it passes. Furthermore, water dripped through a leaky roof also damages the walls, ceilings, air vents, floors and even your carpets and furniture. So you have to address a leaky roof as early as possible to avoid any further damage.
How to DIY repair a leaking roof in emergency?
 Image Source: roofingcalc.com
While some minor roof leaks in the outdoors can wait until a professional comes in to check. Roof leaks that pose threat to the structure or damage your favorite furniture should be addressed quickly. Here’s how you can deal with a roof leak yourself in an emergency situation.
Materials needed for DIY roof repair
- Plastic sheeting
- 3-4 pieces of lumber (2 by 4s)
- Utility knife
- Sealant
- Some extra pieces of shingles
- Some nails and hammer
Step – 1:
Cover the leaking section of roof with the plastic sheet from eaves to the peak. Leave a little bit of sheet extra in all the sides to cover more area as a precautionary measure.
Step – 2:
Cut the sheet with the help of a utility knife and wrap the end of the sheet around the piece of lumber. Staple the sheet to the lumber so that it does not fall apart due to blowing wind.
Step – 3:
Sandwich the assembled area with one more lumber piece and nail the boards together with nails.
For extra safety place extra sheet on the repaired part and fix it to the bordering shingles (or place some extra pieces that you carry) with the help of a sealant. The new shingles can also be placed under the damaged ones before you begin repairing the roof.
Be careful as you work because this kind of repairs can be both difficult and dangerous. Don’t get on to the roof unless follow all the safety measures like anchoring perfectly or using a strong ladder. Above all, do not get on the roof when it is raining or when the wind is strong. If in doubt, roof repairs are always better left to the professionals.